
Nuggets of Revit 9.1
Published September 24, 2006
by Cyril Verley, RA
Update Point Release for Revit 9.0
It feels like only yesterday I was using Revit 3.0, crawling every step of the way to get Revit to perform as I thought an architectural software package should. It’s funny how Revit’s improvements with their major and minor releases always seem to give you about 90% of exactly what you want; which is in fact no different than any other software release. Yet it’s that remaining 10% that causes you pain and demands calls to your doctor for medication for hair removal done manually. As five years have passed, the pains seem to be getting less and less. And now Autodesk’s newest point release; Revit 9.1, once again has refined, improved and brought closure to a handful of existing features we all know and enjoy. Here are a few of those nuggets of Revit 9.1.
Revision Clouds and Tags
One feature I know many of my Revit clients will enjoy is the improved display control for revision bubbles and their tags. In the past, Revit’s revision feature worked great. The clouds were smart and linked to the revision, which also linked to the bubble tag, which also linked to the revision schedule on the title sheet. However, one thing you could not do elegantly was to turn off the display of the clouds while keeping the display of its associated revision tag.
Autodesk has now solved this issue by allowing a display control in Revit’s revision dialog box. This allows the user to control the display of the bubble and the tag separately. It’s very cool, very easy to use and edits you make within that single dialog box ripple through the entire drawing set. Thus, you don’t have to remember where you added the clouds for Revision #1. You simply change the display control graphics and Revit updates all the sheets.

“Hide at Scales Coarser Than” for Elevations
Another amazing feature that Revit introduced a few releases ago was a display setting for sections called “Hide at scales coarser than”. To preface what this feature does, allow me to describe something that happened to me during work for one of my clients. Two years ago, a client of mine designing a 160 million dollar aquarium in London hired my company to build the Revit model. One of the first views created in the model was a 1:200 scale site plan. The view looked fine and was free of odd section lines. As the model progressed, each of the 75 exhibits required a couple of sections and interior elevations. Once those views were built and it was time to print the drawing set, the 1:200 view was unexpectedly covered with the exhibit section lines and elevation markers. For some reason, the callouts for all those views appeared on all my other views. What a pain!!!
To clean up the 1:200, Revit (at that time) included a feature which allowed you to pick each section and elevation marker, one at a time to “hide the annotation in the view”. This was an OK fix but not very elegant.
Then Autodesk created an amazing feature called “Hide at scales coarser than”. In short, when you placed a section into a ¼” = 1’0” view, that section would only display in other views of smaller scale such as a ½” or 1” = 1’0” which is where you would want to view them. And those same sections would NOT appear in scales higher or “coarser than” that scale, thus the 1:200 site plan would be clear of any surprise sections.
Though “Hide at scales coarser than” was a great addition for sections, it did not work for elevation callouts until now. With Revit 9.1, elevations now include this same property parameter allowing the same view control as sections, once again allowing more hair to remain on my head.

There is only a word of warning about this feature. If you change the scale of your plan view from 1/4” = 1’-0” to 1/8” = 1’0”, don’t be surprised if your section and elevation markers disappear. To make those views re-appear, simply reset this display property value for each section and elevation.
Snappy Section Points
There is one more thing regarding sections: in the past, sections placed in a plan view could be moved or rotated. However, these types of edits were limited and could not be done precisely using picked points on the section line. Sections in Revit 9.1 now include a grip at either end of the sectional line that allows the precise movement or rotation of a section line.
It’s a good feature but I have found a subtlety in its use. If you need to rotate a section, the “head” sectional graphic needs first to be temporarily changed to the “tall” sectional graphic. Otherwise, the “head” graphic displays a grip endpoint but it doesn’t seem to work. Once rotated, you can then cycle the sectional graphics to your desired setting. Hey, as long as my section is coordinated, this subtlety is NBD.

Cutting Edge Columns
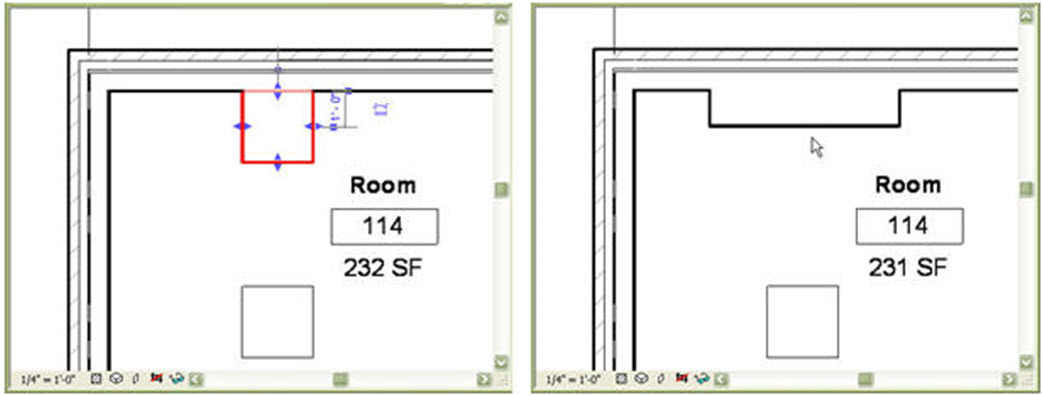
In the past, “columns” in Revit were sort of an odd duck. In fact, I would tell my clients to think of them more like “column covers” or “pilasters” and would recommend using “structural columns” as the Real McCoy. I do like the way “columns” work, especially when they absorb the characteristics of an intersecting wall. However, I was always peeved they were unable to affect the overall square footage area of the room in which they were placed – until now.
Columns, like walls, can now be included in the overall area of a room. As the column command is launched, the “options bar” displays a switch allowing the user to choose if the column is to be “room bounding” or not.

BTW, there is one additional nugget I have been telling my clients regarding columns, long before the release of Revit 9.1. I always thought it odd that there is a need to create a new type for each desired column size. If I wanted column shapes that were 18”x24”, 16”x20” or 12”x24”, I had to create a unique column type for each size. It seemed to me columns should be more fluid and stretch at will. So I would recommend my client edit the column family by changing the column’s depth and width “type” parameters to “instance” parameters. To do so, pick one of the inserted columns and in the options bar, choose the button titled “Edit Family”, and click “Yes”.

In the Design Bar, pick “Family Types”, then choose “Depth”, “Modify”, “Instance” and finally click OK. Pick “Width”, “Modify”, “Instance”, click OK and click OK again. You have just reset the values of the columns Depth and Width from a “type” parameter to an “instance” parameter. To load these changes back into the project, go to the Design Bar, click, “Load into Projects” and choose “Yes”.

Now you can pick the existing columns and freely stretch each edge to any length you desire.
Setting UNITS for DWG Exports
Another feature in past versions of Revit that always seemed odd to me was the fact that even though your Revit model was set to units of feet and inches, the units of the exported DWG could not be controlled. Now, within the export to “CAD Formats” (for a DWG export) dialog box, you can click the Options button and preset the “One DWG unit is” setting. You can also click the check box that will “Export rooms and areas as polylines”.

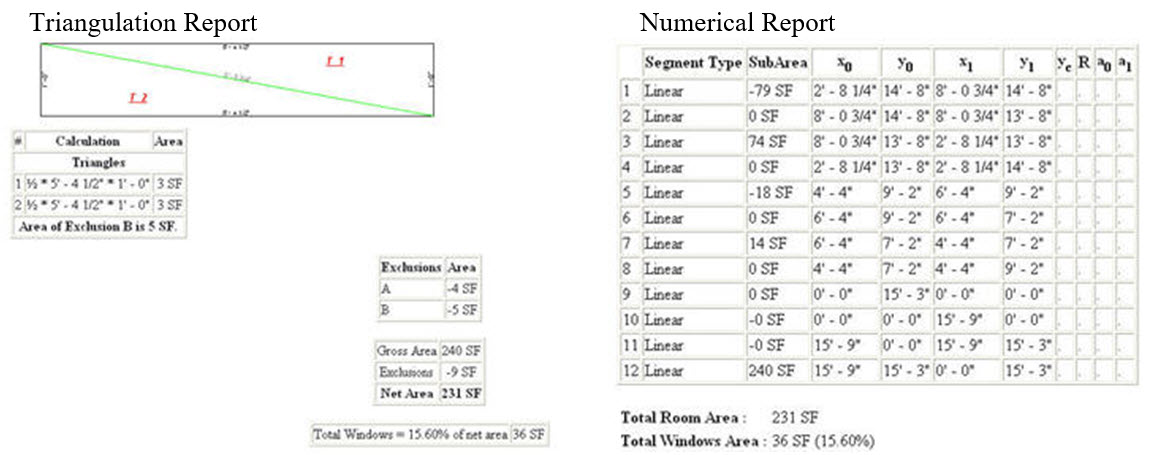
Export Revit to HTML Room/Area Reports
There is one more item to mention that is new to Revit 9.1 which is subtle but useful. You can now export net room and area data from your Revit model to an HTML file. The exported data is derived from the room objects in the model and thus the exported area data is net area, not gross.
In the file menu, click “Export” and then choose “Room/Area Report”. There are two types of reports from which to choose. The “Triangulation Report” graphically displays each space (and exclusions such as columns) using single lines and dimensions while the “Numerical Report” is more textual. Both reports also list the net areas for each space.
Before you create the report, be sure you also click the “Settings” button in the “Room/Area Report” dialog box and click the two check boxes titled: “Use triangulation with exclusions” and “Report window area as percentage of room area”.
Overall, Revit 9.1 definitely feels like an Autodesk point release. It includes a lot of great updates to existing commands and a few new features as well. I would recommend installing this point release for your practice. I have, and I seem to be keeping more hair than expected.